Hey everyone, it’s me, Dave, welcome to our recipe page. Today, I’m gonna show you how to make a distinctive dish, snap'n peppery beef jerky. One of my favorites food recipes. For mine, I will make it a bit unique. This will be really delicious.
Snap'n Peppery Beef Jerky is one of the most favored of current trending foods in the world. It is easy, it is fast, it tastes delicious. It’s appreciated by millions every day. They’re fine and they look fantastic. Snap'n Peppery Beef Jerky is something that I’ve loved my entire life.
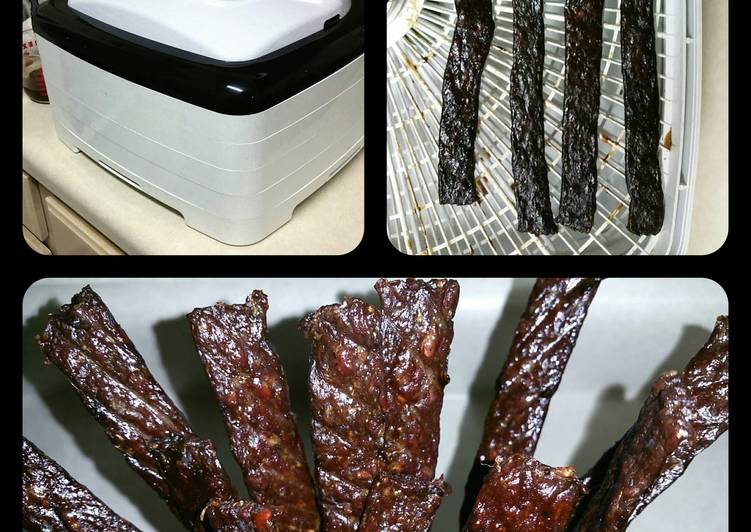
I show you how easy it is to make homemade Peppered Beef Jerky in your oven. Click "Show More" below for the recipe!!! Slowly-marinated beef strips dry into savory pieces of peppery beef jerky in a food dehydrator.
To begin with this particular recipe, we must first prepare a few ingredients. You can cook snap'n peppery beef jerky using 16 ingredients and 10 steps. Here is how you cook that.
The ingredients needed to make Snap'n Peppery Beef Jerky:
- Make ready Hardware Needed
- Take 1 dehydrator
- Take 1 Jerky Gun
- Prepare Basting Sauce
- Take 1/4 cup worcestershire sauce
- Take 1/4 cup liquid smoke
- Make ready 1/4 cup ketchup
- Prepare Ingredients
- Take 2 1/2 lb 93/7 ground beef
- Prepare 2 1/4 tsp sea salt
- Get 1 1/8 tsp of Accent seasoning
- Prepare 1/4 tsp garlic powder
- Prepare 1/4 tsp red pepper flakes
- Get 1 1/8 tbsp meat tenderizer
- Prepare 1 1/2 tsp ground black pepper
- Make ready 1 1/2 tbsp brown sugar
It was once thought of as a lockjaw-inducing, cow-hide-tough snack fit for grizzled truckers and hangry road trippers. These days small batch, artisanal jerky has become pervasive across Canada. GOES WHERE YOU GO: Snack-drawer savvy, lunchbox-ready and the perfect backpack addition, Peppered Beef Jerky is ready-to-eat when you are. Squeeze any air from the bag, seal and refrigerate the jerky.
Instructions to make Snap'n Peppery Beef Jerky:
- In a small bowl mix all of the basting sauce ingredients and mix well. Set aside.
- In a large bowl, mix together the rest of the ingredients by hand. Make sure all of the spices are well incorporated into the ground beef.
- Load the jerky gun and begin squeezing out long strips of jerky onto the dehydrator trays.
- With a basting brush, brush all of the jerky strips with the basting sauce. (You only need to do the top side at this time.)
- Turn the dehydrator on and set it to the jerky setting which is 160°F/71°C. Let it run for 2 hours.
- Turn all of the jerky strips over and pat them with paper towels to remove excess grease. Baste the tops with the basting sauce and let run another 2 hours.
- Wipe off the excess grease with a paper towel. Flip the jerky strips and wipe again. Baste with sauce and dehydrate for 1 hour.
- One last time. Wipe off the excess grease with a paper towel. Flip the jerky strips and wipe again. Baste with sauce and dehydrate for 1 hour.
- They are ready to eat warm, but I like to let them cool. The basting sauce transforms into an almost savory candy-like coating and gives the jerky some snap.
- Notes: My jerky gun came with 2 tips. 1 for making thin jerky and a dual tip for making thicker ones. I used the thicker tip for this recipe. If you wish to make the thinner kind, you will need to adjust the dehydrating times accordingly.
It will keep for several weeks. Homemade beef jerky just got faster than ever. First, start with some flank steak, because it's lean, and lean is always better for beef jerky. Next, break out the parchment paper (which you should have left over from your DIY chocolate design project a few months ago) and lay out a sheet. Homemade Beef Jerky made easy with dozens of tasty recipes.
So that is going to wrap it up with this exceptional food snap'n peppery beef jerky recipe. Thank you very much for reading. I’m confident you will make this at home. There’s gonna be more interesting food at home recipes coming up. Don’t forget to save this page in your browser, and share it to your family, friends and colleague. Thanks again for reading. Go on get cooking!